Silver Shrink Mirror is a metalized plastic laminate. During manufacture, while the material is hot, it is stretched both across the web and linearly. This orientation builds in a tension. When sufficient heat is applied, the material "unlocks" and returns to its original state. To make a mirror, the material is held securely on four sides, heat is applied and the material shrinks. This shrinking effect produces a lightweight, self-extinguishing, distortion-free mirror surface. The process is simple and easy to learn.

Building The Frame
Since the shrinking action generates substantial pressure, a strong frame is required.
Square tube metal, angle iron, or wood will work. If wood is the choice, five quarter or 2"x 2" (5cm x 5cm) lumber is the minimum size.
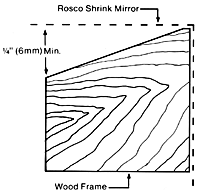
It is important to elevate the mirror surface °" (6mm) off the stile, rail and toggle by bevelling the flat edge or adding a °" (6mm) lip on the outside of the flat. (See Figure 1). This will prevent the frame from showing through after the mirror has shrunk.
Stiles and toggles (bracing) should be placed no more than three feet from one another. To assure frame integrity, all joints should be welded or glued and screwed.
Mounting The Material

before heating and shrinking
The Shrink Mirror should be applied to the frame in the same manner as one would apply muslin to a flat.
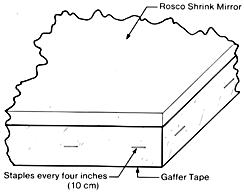
Begin at the center, pull material taut working from opposite sides. Work toward the corners, eliminating all wrinkles (very important). Tape the material to the flat using a good quality gaffers tape. Staple every 4 inches (10cm) through the tape and Shrink Mirror. (The taping will eliminate tearing around the staples in the shrinking process.) Be sure that the corners are free of wrinkles and these are stapled securely to the frame. This will produce a wrinkle-free mirror (See Figure 2).
Double stick polyurethane tape can be used to attach the material to metal frames. The same technique should be employed as with a wooden frame.
Note: Rosco Shrink Mirror may appear wrinkled or uneven before it is shrunk with heat. These wrinkles disappear, however, after the material is placed on a frame and heat is applied. When heated properly, Rosco Shrink Mirror will appear smooth and evenly reflective.
Heating And Shrinking
Some practice is needed to develop the proper technique for the shrinking process.
An industrial heat gun, or the heating surface of a vacuum form machine, will work to adequately warm the material. (A hair dryer, pressing iron or light bulb will not work.)
A temperature in excess of 400 degrees F (200°C) is necessary to shrink the mirror. Begin heating the material in the center of the silver side (The material can also be heated from the back). Heat in ever widening circles, chasing wrinkles toward the edges and corners. In the case of a bank of heat lamps, slowly move the material past the lamps, chasing the wrinkles toward the end of the flat. Occasionally remove the heat from the material and allow it to cool. If wrinkles occur in sections you have already shrunk, simply reheat and repeat the process. Stay no longer in an area than you would if your hand was directly in front of the heat source. Most heat sources should be kept about five inches (12 cm) away from the film.
CAUTION: Care must be taken to avoid overheating the plastic. Just prior to melting a hole in the material, a trace of smoke can be observed. If this occurs, immediately remove the heat source, otherwise a "blushing" or melting will occur on the surface. We recommend you make a small practice mirror to get the feel of shrinking before you commit to a large surface.
Cleaning Instructions
Use Windex or similar ammonia glass cleaner with a soft cloth. Rinse with water. Clean very carefully using only clean, soft cloths.
